
DIY acoustic wood slat panels combine a decorative wood surface with an acoustic backing layer to reduce echo and reverberation in a room. Building them from scratch costs $50-$150 per panel, depending on wood species and panel size - roughly half the price of pre-made panels - and requires only basic woodworking tools. This guide covers the complete build from material selection to wall mounting.
What Makes a Wood Slat Panel Acoustic
Wood slats alone do not absorb sound. A bare wood surface reflects sound the same way any hard surface does - it adds to the echo problem rather than solving it. The acoustic performance of a wood slat panel comes from two elements working together: the backing material behind the slats and the air gaps between them.
The backing material - typically acoustic felt, open-cell foam, or mineral wool bonded to an MDF or plywood substrate - absorbs sound that passes through the gaps between the slats. The denser and thicker the backing, the higher the NRC rating of the finished wood panel. A 1/2-inch acoustic felt backing achieves NRC 0.55-0.70. A 1-inch mineral wool backing achieves NRC 0.80-0.95.
The air gaps between slats are what allow sound to reach the backing material in the first place. A panel with slats spaced too closely together acts as a near-solid surface and reflects most of the sound before it reaches the absorptive layer. A panel with gaps equal to approximately 30-50% of the total surface area achieves the best balance between acoustic performance and visual density.
A decorative wood slat wall with no acoustic backing and no intentional gap ratio is an interior design product, not an acoustic one. The presence of felt or foam behind the slats - and how it is attached - is what separates the two.
Materials and Tools You'll Need
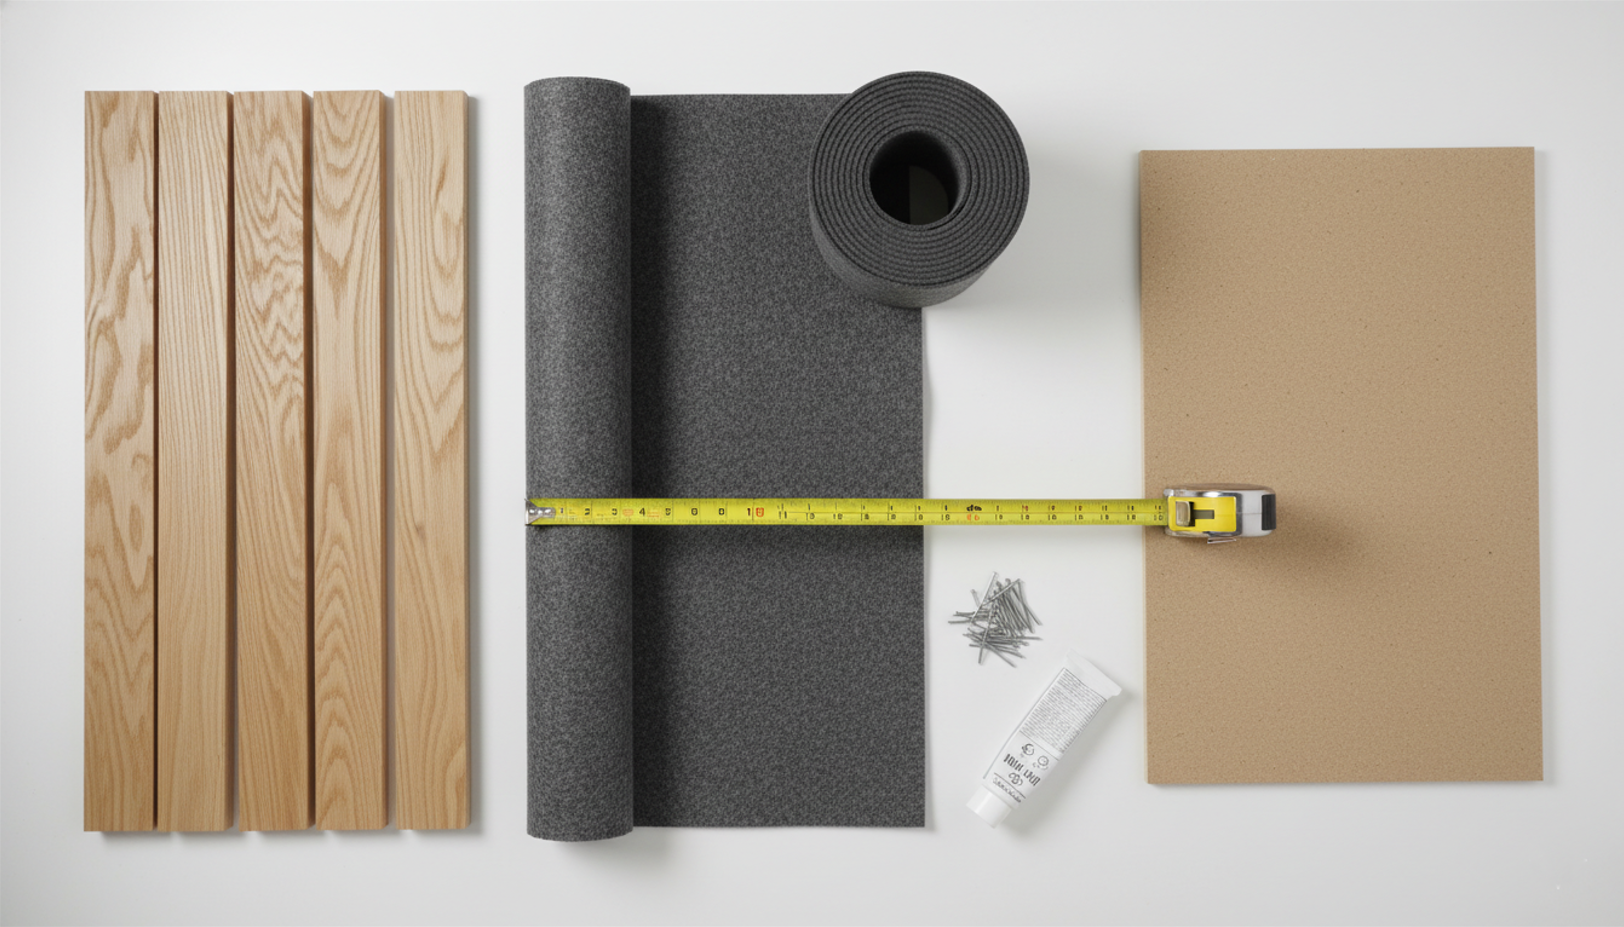
A standard 24×48-inch panel requires four categories of materials: a rigid backing board, an acoustic layer, the slats themselves, and mounting hardware.
Backing Board
The backing board is 3/4-inch MDF or plywood cut to panel size. MDF is denser and flatter - better for paint finishes. Plywood is lighter and handles moisture better - better for rooms with humidity variation. A single 4×8 sheet yields two 24×48-inch panels or one 48×48-inch panel.
Acoustic Layer
The acoustic layer goes between the backing board and the slats. Acoustic felt (1/4-1/2 inch, NRC 0.55-0.70) is the easiest to work with and available in adhesive-backed rolls. Open-cell acoustic foam (1 inch, NRC 0.70-0.85) performs better but is more compression-sensitive. Rigid mineral wool board (1 inch, NRC 0.90-0.95) offers the highest absorption but requires mechanical fastening rather than glue.
Slats
The slats can be purchased as pre-cut 1×2 dimensional lumber (actual size 3/4×1-1/2 inches) or ripped from a 4×8 sheet of 1/2-inch plywood. Dimensional lumber is faster and requires no table saw. Plywood strips cost about 60% less per linear foot but require a table saw or circular saw with a guide rail. For a 24×48-inch panel with 1-1/2-inch slats and 1/2-inch gaps, you need approximately 15 slats at 48 inches each.
Finishing and Mounting Hardware
Finishing and mounting materials include: matte black or dark paint for the backing board face, wood stain or oil for the slats, construction adhesive, 1-1/4-inch brad nails, and scrap wood cut to your gap width for use as spacers. For wall mounting, either a French cleat (3/4-inch plywood ripped at 45°) or heavy-duty picture rail works well, depending on panel weight.
Tools needed:
- Miter saw, or circular saw
- Brad nailer or hammer
- Orbital sander (80 and 120 grit)
- Measuring tape, pencil, square
- Paint roller or brush
- Table saw (only if ripping plywood into strips)
- Level (for wall mounting)
How to Build DIY Acoustic Wood Slat Panels - Step by Step
The build breaks down into six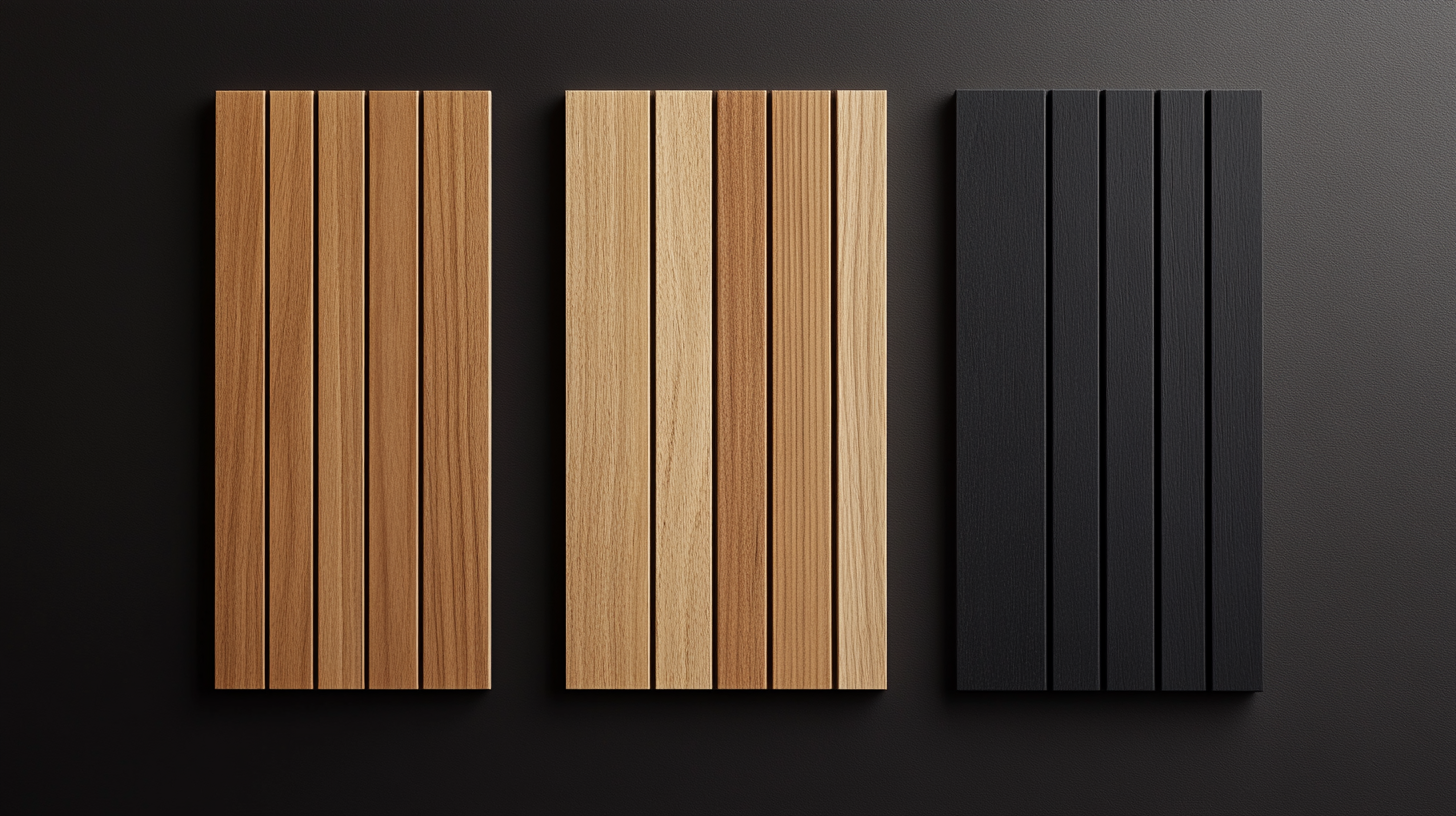 stages: backing board, paint, acoustic layer, slat finishing, assembly, and mounting. Each stage must be completed in order - the acoustic felt goes on before the slats, and the slats get finished before they are attached. Plan for 4-6 hours of active work time for a single 24×48-inch panel, plus drying and curing time between stages.
Step 1 - Plan the Layout and Cut the Backing Board
Decide on the finished panel size before cutting anything. Standard panel sizes are 24×48 inches (two panels per 4×8 sheet) or 48×48 inches. Full wall coverage is achieved by tiling multiple panels.
Calculate slat quantity using this formula: panel width ÷ (slat width + gap width). For a 24-inch wide panel with 1-1/2-inch slats and 1/2-inch gaps, that is 24 ÷ 2 = 12 slats. Add one extra slat as a buffer for cuts.
Cut the backing board to the finished panel size using a circular saw with a straightedge guide. Check all corners with a square before proceeding - a backing board that is not perfectly square will cause slat misalignment across the full panel width.
Step 2 - Paint the Backing Board
Paint the front face of the backing board before attaching either the acoustic layer or the slats. This is the background color visible through the gaps between slats.
Matte black is the most common choice - it creates depth between the slats and disappears visually, making the wood stand out. Dark charcoal or deep navy work similarly. A lighter background in the same tonal family as the slats creates a softer, more uniform look.
Apply two coats of matte latex or chalk paint with a small roller. Allow full drying time before the next step - wet paint under acoustic felt or foam will affect adhesion.
Step 3 - Attach the Acoustic Backing Material
Attach the acoustic layer to the painted face of the MDF board before installing any slats. This is the step that determines whether the finished panel is acoustic or purely decorative.
For most home projects, acoustic felt is the right starting point - it is the easiest to install, the least expensive, and performs well enough for living rooms, home offices, and bedrooms. Peel-and-stick acoustic felt cuts with scissors and presses directly onto the painted board face. For non-adhesive felt, apply construction adhesive in a grid pattern and press the felt down firmly with a hand roller to eliminate air pockets.
Open-cell foam requires a full coat of construction adhesive on the board face. Press the foam sheet down and hold the edges with painter's tape while the adhesive cures - approximately 30-60 minutes. Do not stack heavy objects on foam during curing, as it compresses permanently under sustained pressure.
Mineral wool board cannot be glued reliably to MDF alone. Use 1-inch roofing screws with large-diameter washers at 6-inch intervals across the surface. The screw heads will be hidden behind the slats. Choose mineral wool when building panels for a music room or home studio where maximum NRC matters more than installation simplicity.
Step 4 - Cut and Finish the Slats
Cut all slats to the finished length before applying any stain or finish. Consistent length is critical - even a 1/16-inch variation across slats becomes visible when the panel is on the wall.
For dimensional 1×2 lumber, use a miter saw with a stop block set to the finished dimension and run all slats through in a single setup without moving the stop block. For plywood strips, use a featherboard to keep a consistent width on the table saw and a push stick for safety on narrow cuts.
Sand all slats with 80 grit to remove mill marks, then finish with 120 grit. Apply stain, oil, or clear coat before installation - finishing slats in place on the panel produces uneven results and is significantly harder to do cleanly. Allow full cure time per the finish manufacturer's instructions before handling.
The finish choice depends on the wood and the room. Raw pine with clear matte oil reads light and Scandinavian. Oak with a medium walnut stain gives a warm mid-century result - the most popular combination. Poplar with ebony stain creates high contrast against a black backing. Natural walnut with clear oil needs no stain and produces a premium look at the highest material cost.
Step 5 - Attach the Slats to the Backing Board
Lay the backing board flat on a workbench with the acoustic layer facing up. Mark a center line along the panel length to confirm slats are running parallel to the edges.
Set the first slat flush with one long edge of the panel. Apply a thin bead of construction adhesive down the back face of the slat, place it on the acoustic layer, and secure it with two brad nails driven through the slat, through the acoustic layer, and into the MDF below. Use a nail gun set to medium depth - overdriving nails splits thin slats.
Cut spacer strips from scrap wood to your gap width (typically 1/4 to 1/2 inch). Place spacers between each slat during installation to maintain consistent gaps. Glue and nail each slat in sequence, removing the spacers as you go. Check alignment every 4-5 slats with a square - minor drift accumulates across the panel and is difficult to correct after the adhesive sets.
The last slat on the opposite edge may need to be ripped down to fit - measure the remaining space before applying adhesive and adjust the final slat width accordingly.
Step 6 - Mount the Panel on the Wall
Allow the panel to cure flat for 24 hours before mounting. Construction adhesive takes 24-48 hours to reach full strength.
French cleat mounting
French cleat mounting is the recommended method for panels over 10 lbs. A French cleat is a length of 3/4-inch plywood ripped at a 45° angle - one piece screws to the wall, the other attaches to the back of the panel, and the two interlock. French cleats allow the panel to hang securely and be repositioned without hardware changes. Use a level to install the wall cleat before hanging the panel.
Direct wall screws
Direct wall screws work for smaller panels under 15 lbs. Pre-drill countersunk holes through the MDF backing at the top corners and midpoint, hold the panel in position, mark the wall, drill anchors in drywall, and drive 2-1/2-inch screws. Fill the countersink holes with wood filler and touch up with stain.
For a full wall installation with multiple panels, install all wall cleats at the same height using a level line across the full wall before mounting any panels. This ensures all panels sit flush without individual adjustment.
Slat Spacing and Sizing
The share of open gap area relative to total panel area determines how much sound reaches the acoustic backing. A higher open area means more absorption; a lower open area means more visual density and less absorption. To avoid the "zebra stripe" effect - where equal-width slats and equal-width gaps create an optically jarring striped pattern - always keep the gap width less than the slat width.
|
Slat Width |
Gap Width |
Open Area |
Acoustic Effect |
Visual Character |
|
1-1/2 inch |
1/4 inch |
14% |
Low-moderate |
Dense, uniform |
|
1-1/2 inch |
1/2 inch |
25% |
Moderate |
Standard look |
|
1-1/2 inch |
3/4 inch |
33% |
Good |
Open, airy |
|
1 inch |
1/2 inch |
33% |
Good |
Fine, graphic |
|
1 inch |
1 inch |
50% |
High |
Very open |
The most common configuration for living rooms and home offices - 1-1/2-inch slats with 1/2-inch gaps - achieves 25% open area and produces a balanced result: noticeable echo reduction with a clean, dense visual appearance. For music rooms and home studios where acoustic performance is the priority, use narrower slats with wider gaps to maximize the open area above the backing material.
Wood Types and Finish Options
The choice of wood species comes down to three variables: budget, desired appearance, and how much finishing work you want to do. Here is the full range from most affordable to premium.
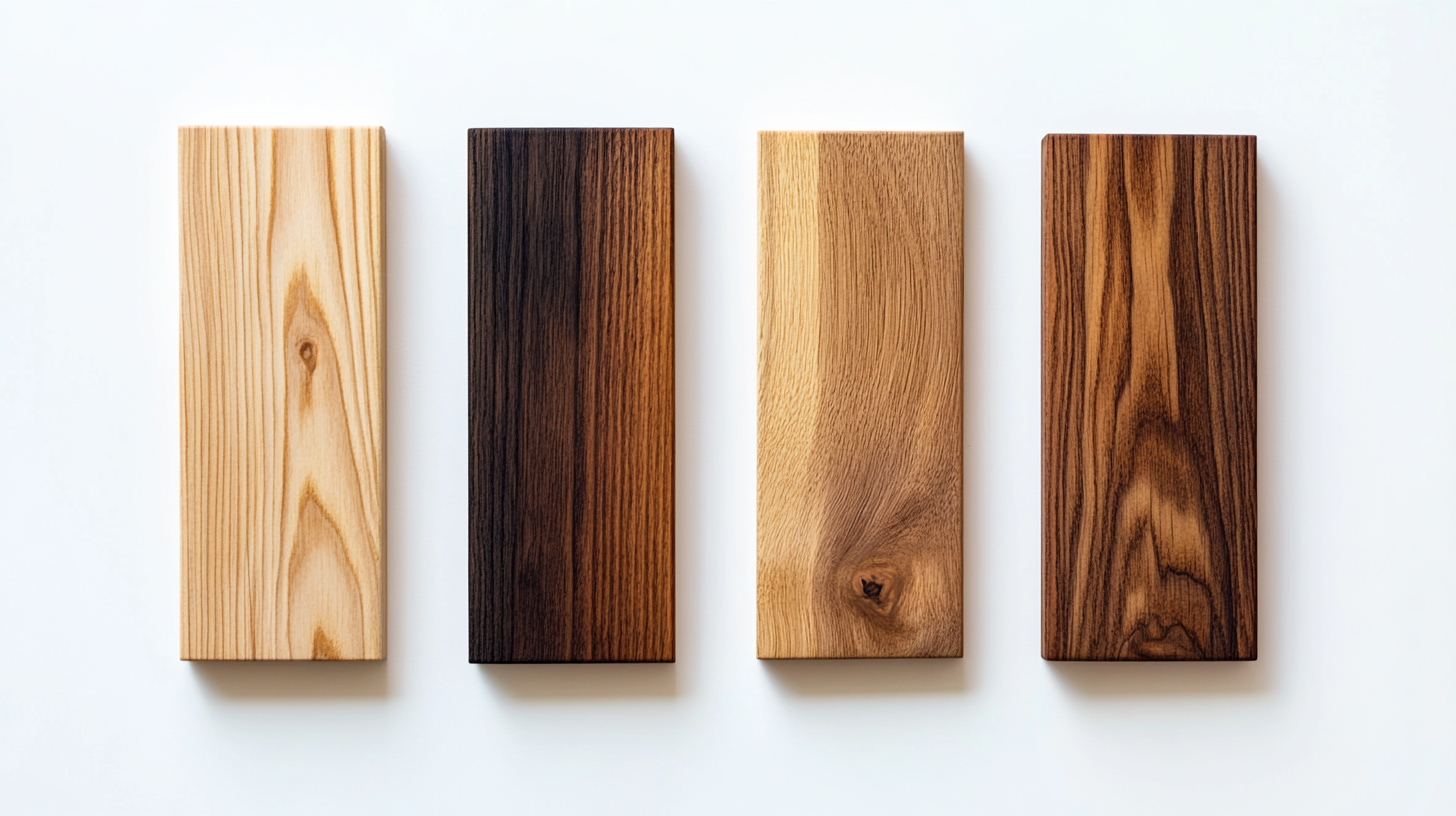
Pine
Pine ($0.50-$1.00/linear ft) is the default starting point for most DIY builds. It is soft, cuts cleanly, and accepts stain readily - though grain variation means color results can be inconsistent. Best finished with paint or a heavily pigmented stain rather than natural oil.
Poplar
Poplar ($1.00-$1.50/linear ft) is harder than pine with a smooth, nearly grain-free surface. It takes dark stains evenly, making it the best choice for ebony or near-black finishes where pine would look blotchy. A small step up in price that produces noticeably cleaner results.
Oak
Oak ($2.00-$3.50/linear ft) has a pronounced grain that looks best under clear or light stains. The most widely used species for mid-century modern and Scandinavian-style panels. Harder to cut than pine - use sharp blades and take your time on the miter saw. Dimensionally stable and widely available in 1×2 form.
Walnut
Walnut ($5.00-$9.00/linear ft) has a rich, chocolate-brown tone that needs only clear oil - no stain required. The premium choice for high-end interiors. Harder to source in 1×2 dimensional form and significantly more expensive, but produces a finished panel that rivals commercial products at half the installed price.
Plywood strips
Plywood strips ($0.20-$0.40/linear ft) are the most economical option by a wide margin. Birch plywood ripped into strips produces clean edges and a smooth face suitable for paint or light stain. Edge grain is visible on the slat face - acceptable for painted finishes, less ideal for natural wood looks. Requires a table saw or circular saw with a guide rail.
Build Once, Hear the Difference
A DIY acoustic wood slat panel is one of the few home improvement projects where the visual result and the functional result are equally strong. The backing material costs a few dollars per panel and adds nothing to the visual profile - but it is the difference between a decorative wall treatment and one that genuinely changes how the room sounds.
Build the first panel as a prototype: use pine, standard 1×2s, and peel-and-stick felt. Install it and listen. If the echo reduction is sufficient, replicate it across the wall. If you want more absorption, switch to 1-inch mineral wool on the next batch. The construction is identical - only the backing layer changes.
Recent posts


