Acoustic foam is one of the simplest and most effective ways to reduce echo and improve sound quality. However, if you're not careful, installing it can damage paint, cause drywall issues, or leave permanent marks — especially in rented spaces. The good news? You don't need to choose between good acoustics and preserving your walls.
Here's how to safely and carefully mount acoustic panels made of foam without causing any damage.
Why Wall-Safe Installation Methods Matter
Protecting Paint and Wall Finishes
Standard adhesives and construction glue can pull paint right off the wall. Even strong double-sided tape can leave residue or tear drywall if removed improperly. If your goal is clean acoustics, it shouldn't come at the cost of chipped paint or flaking plaster.
Wall-safe installation methods help keep the foam in place without compromising surface finishes. That matters whether you're dealing with fresh paint, wallpaper, or decorative wall panels.
Avoiding Permanent Damage to Rental Properties
If you rent your home, studio, or office, damaging the walls can lead to expensive repairs or lost security deposits. Landlords expect the space to be returned in its original condition — which means no holes, glue stains, or torn drywall paper.
Damage-free mounting methods allow you to enjoy professional-level sound treatment without violating lease agreements or incurring penalties.
Maintaining Property Value and Resale Options
Even if you own the space, long-term value matters. Prospective buyers or tenants often notice scuffed walls, rough patchwork, or obvious repair spots. Using reversible acoustic treatments means you can upgrade your sound environment now without lowering the visual appeal — or resale value — later.
Easy Removal for Future Changes
Design changes happen. Perhaps you would like to rearrange your setup or upgrade to new panels. If your foam is installed with permanent adhesive, moving it becomes a demolition project. Safe installation methods give you flexibility. Panels can be removed, repositioned, or replaced without having to start from scratch or repaint entire sections.
Damage-Free Acoustic Foam Mounting Options
There's more than one way to hang acoustic foam without damaging walls — and no, none of them involve a nail gun. The key is using mounting materials that are strong enough to hold the foam but gentle enough to remove it cleanly.
Double-Sided Adhesive Strips and Pads
This is one of the most popular wall-safe methods. Look for foam-safe adhesive strips designed for temporary use. They provide enough tack to keep the panel in place but peel off cleanly when it's time to remove them. For best results, apply them to both the panel and the wall, press firmly, and allow them to bond for a few seconds.
Removable Spray Adhesives
Some spray adhesives are formulated specifically for temporary applications. These create an even layer of tack across the foam's back surface and can often be removed without peeling paint — but always test first. Spray lightly, avoid over-saturating, and allow time to get tacky before pressing the panel in place.
Velcro and Hook-and-Loop Systems
Velcro strips give you two big advantages: strong hold and easy repositioning. Attach one side to the wall and the other to the foam. You can then remove or adjust panels as needed without any further wall contact. This method is ideal for studios where panel placement might need fine-tuning over time.
Temporary Mounting Hardware Solutions
For those who don't mind small holes in safe areas (like along trim or within wood backing), there are non-permanent hardware options like 3M Command hooks or spring clips. These mount securely but are engineered to remove cleanly. They're great for hanging heavier foam bass traps or composite panels with rigid frames.
Magnetic Mounting for Metal Surfaces
If your space has exposed steel beams, metal doors, or magnetic boards, you can skip adhesives altogether. Simply attach magnetic tape to the foam and use the surface as your mounting point. It's instant, adjustable, and 100% reversible.
Preparing Your Walls for Safe Acoustic Foam Installation
Before you attach anything to your walls, preparation is key. Even the best adhesive solutions won't perform well on dirty or unstable surfaces. Taking time to prep helps ensure strong adhesion and easy removal later.
Cleaning Wall Surfaces Properly
Dust, oil, and moisture can weaken adhesive bonds. Use a clean, dry cloth or a lightly damp sponge with mild soap to wipe down the wall area where the foam will go. Avoid harsh chemicals — they can damage paint or leave a residue. Let the surface dry completely before applying anything.
Testing Adhesive Compatibility
Not all wall finishes respond equally to adhesives. Test your chosen mounting method on a small, hidden area first. Apply, wait 24 hours, then remove and inspect. If there's no damage or residue, you're good to go.
This is especially important with removable sprays or hook-and-loop systems — it is better to be cautious than sorry.
Measuring and Planning Foam Placement
Acoustic foam works best when it's placed with purpose. Use a measuring tape and pencil to map out where each panel should go. Mark alignment points lightly on the wall — this ensures even spacing and clean lines.
Think about reflection points, speaker positions, and symmetry. A good layout makes a big difference in sound control.
Protecting Surrounding Areas During Installation
When using spray adhesive or any tacky substance, mask off nearby walls, trim, or furniture with painter's tape and drop cloths. Overspray is a common issue and can be difficult to remove once it has dried. Protect your space — it takes two minutes and saves a lot of cleanup.
Step-by-Step Installation Without Wall Damage
Installing acoustic foam properly means more than just sticking panels to a wall. A clean, controlled approach helps you avoid alignment issues, adhesive messes, and potential damage to the wall during removal.
Marking Placement Points Accurately
Before you touch any adhesive, take time to plan your layout. Use a pencil and a level to mark the top corners of each panel on the wall. If you're covering a large area, lightly draw horizontal and vertical guidelines to keep everything straight.
Consistency matters. A few degrees off on the first row can throw off the entire setup. Double-check your spacing, especially if you're alternating panel directions or mixing panel sizes. Neat placement improves both sound performance and visual impact.
Applying Adhesive Materials Correctly
Your adhesive method matters. If you're using strips or Velcro, press each piece firmly into the back of the foam before attaching it. Then, press the foam to the wall and hold for 20–30 seconds. Don't rush it — give the adhesive time to bond.
If you're using removable spray adhesive, spray both the panel and (if safe) the wall side. Apply in a well-ventilated area and spray evenly from about 6 to 8 inches away. Avoid soaking the foam — a light, even coat is enough. Let it become tacky before placing the panel.
Whichever method you choose, always follow the product instructions. If the label says to wait before bonding, wait. Skipping that step is where most mistakes happen.
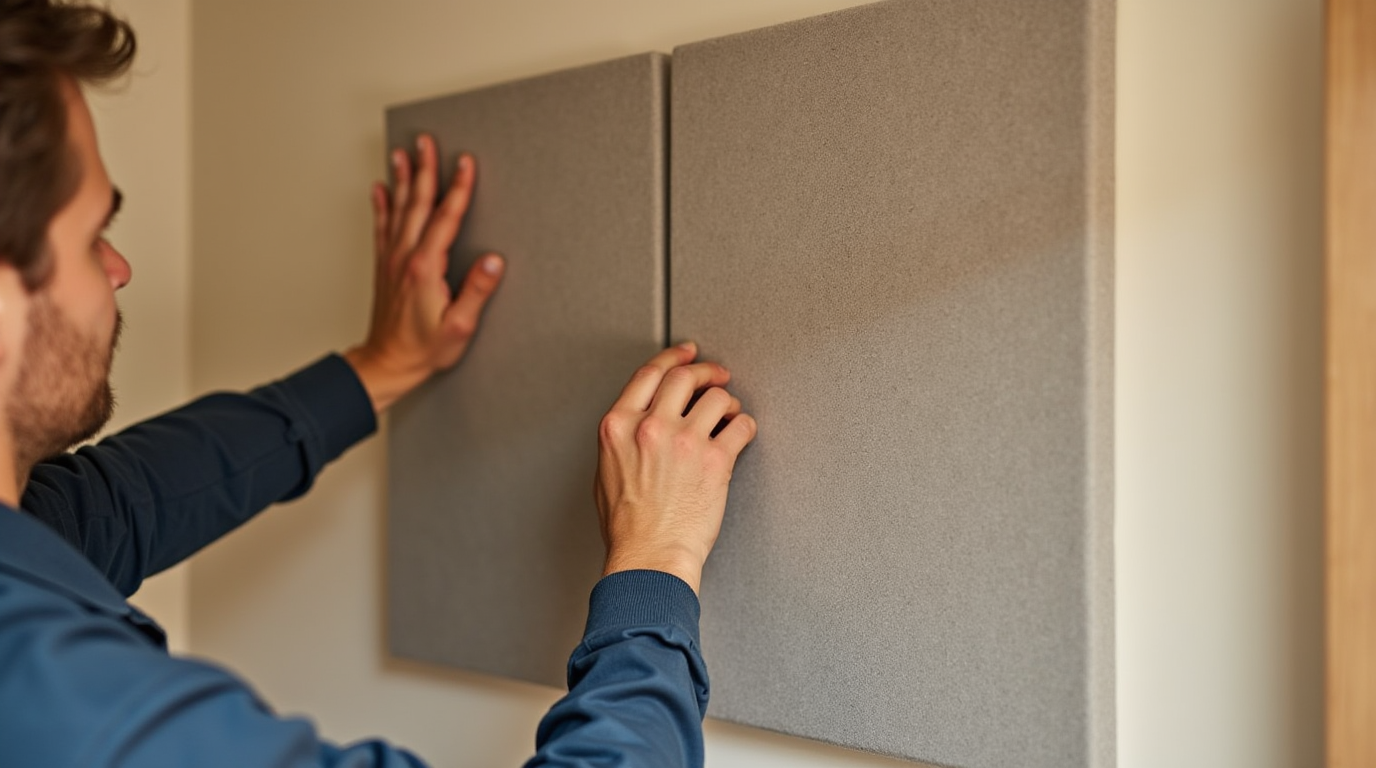
Positioning Foam Panels for Best Results
Now align the panel with your guide marks. Don't angle or slide it into place — that can smear adhesive and risk damaging the wall finish later. Instead, press it straight on, with steady, even pressure across the whole surface.
Start with just a few panels. This allows you to test your adhesive choice, see how the foam responds to the wall surface, and make minor layout adjustments without redoing everything. Once you're confident with the process, continue row by row.
Avoid placing panels too close to heaters, vents, or direct sunlight. Over time, heat and airflow can weaken adhesives or cause foam to distort.
Ensuring Secure Attachment Without Overdoing
There's a balance between "secure" and "overkill." Press the panel firmly — but don't smash it into the wall. Applying too much pressure or using too much adhesive can backfire. Stronger isn't always better, especially if you want the panel to come off clean later.
Once installed, leave the foam alone for a few hours. Let the adhesive set before repositioning or touching it. That curing time helps ensure a stable hold and reduces the chance of corners peeling or sagging.
If any edges start to lift later, don't panic — just spot-fix with a small adhesive pad or a fresh strip. Don't pull the whole panel off unless necessary.
Tools and Materials for Damage-Free Installation
Achieving professional results without damaging your walls begins with using the right tools — and using them correctly. Here's what you'll need, along with an explanation of why each item is important.
Measuring Tape and Level
Accurate placement begins with proper measurements. Use a measuring tape to space out panels evenly and ensure consistent alignment. A level helps keep rows straight — even a slight angle can become obvious across a full wall. This small tool prevents a lot of frustration down the line.
Pencil or Low-Tack Marking Tape
You'll need to mark placement points for each panel. A pencil is ideal for precise, temporary marks on light-colored walls. For darker or delicate surfaces, low-tack painter's tape works better — it peels off cleanly and lets you mark positions without direct contact with the wall finish.
Clean Cloth for Surface Prep
Wall prep is essential. Use a lint-free cloth to wipe down each area where a panel will be placed. This removes dust, grease, and other debris that can prevent adhesives from bonding properly. A clean surface leads to a cleaner install — and easier removal later.
Painter's Tape and Drop Cloths (if Spraying)
If you're using spray adhesive, overspray is a real risk. It can stain walls, furniture, or floors. Painter's tape is perfect for masking off surrounding areas. Drop cloths protect your flooring or baseboards. Taking a few minutes to set up protection saves hours of cleanup or repainting.
Your Chosen Adhesive Method
Select the adhesive method that best suits your situation:
- Double-sided adhesive strips or pads are great for light foam and easy removal.
- Spray adhesives work well for even coverage on larger panels but require more prep.
- Velcro or hook-and-loop strips offer flexibility for repositioning.
- Command-style removable mounting solutions are ideal for heavier or framed panels.
Whatever you choose, make sure it's foam-safe and rated for temporary or non-damaging use.
Ladder or Step Stool for Higher Placements
Don't stretch or guess when placing panels above eye level. Use a stable step stool or ladder to maintain proper positioning and pressure during installation. It's safer, more precise, and lets you work at the correct height without compromising panel alignment.
No power tools are needed. This is a clean and quiet installation. The most important "tools" are patience, a steady hand, and attention to detail. By taking the time to prep and use proper materials, you'll get a result that looks great, performs well — and leaves no trace when it's time to take it all down.
Achieve Perfect Sound Control Without Compromising Your Walls
You don't need to drill holes, peel paint, or damage drywall to get serious acoustic results. With the right tools, products, and preparation, you can treat your space effectively — and still keep your walls in perfect shape.
Damage-free installation isn't just about protecting surfaces; it's also about protecting the environment. It's about flexibility. Maybe you're in a rental and want to keep your deposit. Maybe you're planning to upgrade your setup in a year. Or maybe you just want the flexibility to move panels as your needs change. In all these cases, clean installation methods give you control without sacrifice.
At Sound Pro Solutions, we help you strike that balance — between acoustic performance and wall protection. Whether you're working in a small home studio, a shared office, a podcast setup, or a dedicated theater room, we offer professional-grade solutions that are easy to install and even easier to remove.
We believe great sound shouldn't cost you your walls. With our expertise and product lineup, you can get clarity, comfort, and clean aesthetics — all in one.
Ready to make your space sound better without leaving a mark? We're here to help.
Recent posts


